Stuff. Blogger tarafından desteklenmektedir.
0
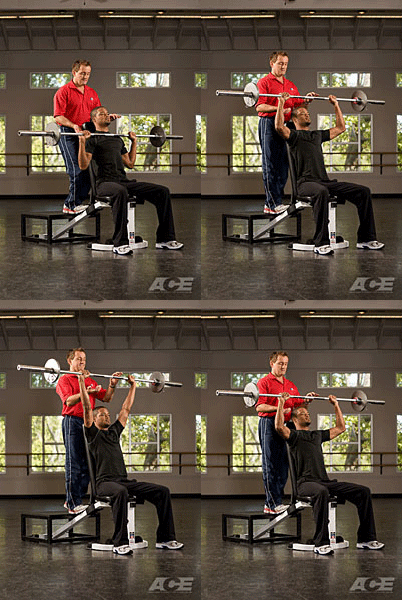
Seated Barbell Shoulder Press |

Step 1

Starting Position: Sit with your back against a backrest so that your head, shoulders and butt make contact with the pad and your feet are firmly on the floor. The bar should be positioned close to your body and level with the upper part of your chest or collarbone. Grasp the bar with the palms facing forward, thumbs wrapped around the bar. Your grip should be slightly wider than shoulder-width or at a width where your forearms are vertical to the floor. Brace your torso by contracting your core and abdominal muscles. If working with a spotter, signal for assistance.

Step 2

Upward Phase: Pull your shoulder blades down and back and hold this position throughout the exercise. If working with a spotter, have them assist you by unracking the bar from the supports. Exhale and press the bar overhead until your elbows are straight. Do not allow your low back to arch. Keep the wrists in neutral position. Do not allow bending at the wrists.

Step 3

Downward Phase: Inhale. In a slow and controlled manner, bend your elbows and lower the bar. Keep your torso rigid, wrists neutral, back in contact with the bench and feet firmly planted on the floor. Mindfully contract the muscles of your back and arms to bring the bar down. Resist yielding to gravity. Be conscious of your head position. Do not allow the bar to come in contact with your face. At the end of your set, signal your spotter for assistance in racking the bar.
Spotting is important to ensure safety in this exercise. The spotter should stand behind you in a split-stance position, positioning themselves with an elevated advantage to assist. The spotter should use an alternating grip with their hands positioned inside of yours near the bar at all times throughout the exercise.
readmore »
0
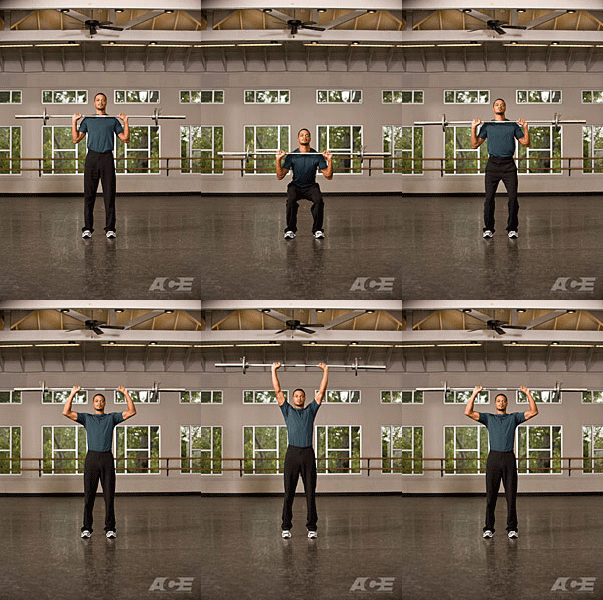
Barbell Push Press |

Step 1

Starting Position: Step under the bar in a split-stance position (one foot in front of the barbell and one foot behind your body). Grasp the bar with your hands slightly wider than shoulder width, palms facing forward. Your elbows should be bent and pointing down. Position the bar directly across the top of your chest.

Step 2

Before loading your spine by unracking the bar, brace your core and abdominal muscles to stabilize your spine.

Step 3

Keep your chest lifted and your head tilted slightly up. Dip slightly to unrack the bar, straightening your hips and knees to lift the bar.

Step 4

Take a step backward and re-position your feet to shoulder-width, side-by-side, with your toes pointed forward or slightly outward. Shift your weight over your heels.

Step 5

Downward Phase: Begin this phase by hinging at the hips, shifting them back and down. Your hips and knees bend simultaneously. As you lower your hips the knees bend and will start to shift forward slowly. Try to prevent your knees from traveling too far forward past the toes. Keep the abdominals/core muscles engaged and try to keep your back flat (do not tuck the tail or arch the low back).

Step 6

Lowered Position: Continue to lower yourself until your thighs are parallel or almost parallel to the floor. If your heels begin to lift off the floor or your torso begins to round, return to start position. Be aware of any movement that may occur at your feet, ankles and knees. Work to ensure that the feet do not move, the ankles do not collapse in or out and the knees remain lined up with the second toe.
Imagine pushing the floor away from you as you return to standing position.

Step 7

Upward Phase: From the lowered position keep your head slightly up, and quickly push through your heels, straightening the hips and knees simultaneously to bring you to an upright position.

Step 8

As the hips and knees become straight, continue the movement by rolling up onto your toes while pressing the bar overhead into full extension. You should feel this movement start at the hips, travel through the trunk and continue through the shoulders and arms. Do not allow your back to arch during the overhead push.

Step 9

Attempt to hold the fully extended position with the bar overhead briefly before returning slowly to the starting position.

Step 10

Start with light resistance then gradually progress this exercise by increasing the weight and increasing the pace of the exercise so that you begin to perform the movement explosively against heavier resistance.
Technique is very important in this lift. Do not progress to explosive movements until you master your technique.

readmore »
0
Barbell Bent-over Row |

Step 1

Starting Position: Stand with your feet slightly wider than shoulder-width, with your toes pointed forward or slightly outward. Position your feet so that the balls of your feet align under the bar.

Step 2

Squat down to grasp the bar just wider than the knees with either a knuckles forward or palms forward grip. Position the bar 1" in front of your feet.

Step 3

Prepare for the lift by keeping the spine in neutral, shoulder blades pulling down and back, chest lifted and head in line with your spine (or chin slightly raised). Your heels should be on the floor, and your shoulders over or slightly in front of the bar. Your eyes should be facing forward or slightly upward.

Step 4

Upward Phase: Before lifting, Brace your core and abdominal muscles to stabilize your spine. Lift the bar off the floor by simultaneously straightening your hips and knees to a 3/4 upright position where the barbell rests midway up your thigh with your arms straight.

Step 5

Slowly pull the bar toward your torso until it touches your abdomen. Maintain a rigid spine without any movement or change in the shape in your back. Keep both feet firmly planted on the floor while maintaining a slight bend in the knees and hips.

Step 6

Downward Phase: Slowly lower the bar back to the starting position while maintaining your back, hip, knee and foot position. Keep the shoulder blades squeezing together and the abdominal muscles engaged. Repeat.

Step 7

At the end of the set, bend the hips and knees to lower the bar to the floor.
Technique is very important in this lift. The tendency is to increase the curve in the low back during the lifting phase. Engage your abdominals to maintain a normal-to-flat spine through the entire lift.

readmore »
0
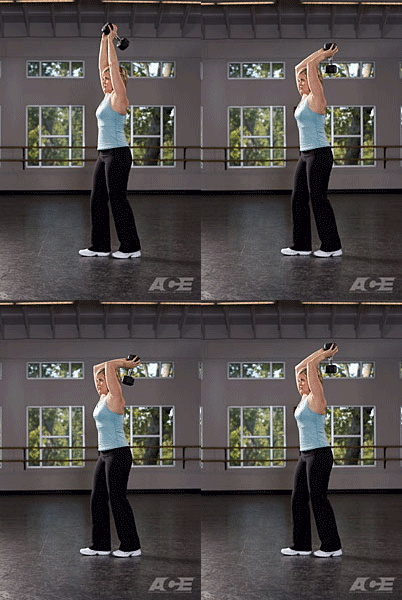
Standing Dumbbell Overhead Triceps Extension |

Step 1

Starting Position: Stand in a split-stance position holding a dumbbell with both hands wrapped around the dumbbell handle. Brace your torso by contracting your abdominal/core muscles. Pull your shoulder blades down and back. Your head and neck should be aligned with your spine.
Maintain these engagements throughout the exercise.

Step 2

Upward Phase: Exhale. Slowly press the dumbbell overhead. Straighten your elbows until your arms are vertical to the floor. You elbows are pointing forward and are straight but not locked. The dumbbell should be positioned directly over your head with your palms facing upwards and the dumbbell hanging vertically from your palms. Maintain your balance. Do not change the position of your head, torso, upper arms, wrists or feet.

Step 3

Downward Phase: Inhale. Bend your elbows in a slow and controlled manner, lowering the dumbbell behind your head. Do not allow the upper arms to move. Continue to bend the elbows to a 90 degree bend or until your upper arms begin to move backward. Do not make contact with the back of your head. Do not change the position of your head, torso, upper arms, wrists or feet. Slowly straighten the elbows and return to start position. Repeat.
Attempt to keep your upper arms vertical to the floor throughout the exercise and your elbows shoulder-width apart.
readmore »
0
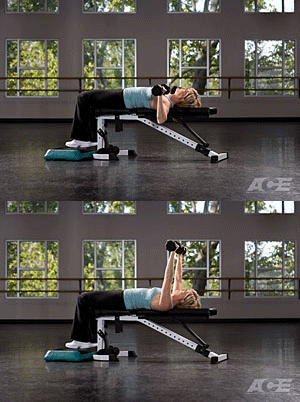
Dumbbell Bench Press |

Step 1

Starting Position: Lie on your back on a flat bench or raised platform with your feet firmly on the ground, your spine in neutral position and a dumbbell in each hand. If working with a spotter, signal the spotter for assistance in handing you the dumbbells.

Step 2

Pull your shoulder blades down and back so that they make firm contact with the bench. Your head, shoulders, and butt should make contact with the bench and your and feet should make contact floor throughout the exercise. Signal your spotter for assistance in moving to your starting position. Grasp each dumbbell with a palms facing forward, and thumbs wrapped around the handles. Keeping your wrists in neutral, press thedumbbells toward the ceiling. With the elbows fully extended, the dumbbellsshould be over the eyes or just below eye level.
Step 3

Downward Phase: Inhale. In a slow and controlled manner, lower thedumbbells in unison. The dumbbells should come toward level with the mid-chest, but about as wide as the armpits. Keeping your wrists in neutral, gently touch the dumbbells to your chest without bouncing. With elbows close to your sides the exercises emphasizes more triceps. If the elbows are flared out from the body the exercise emphasizes more pectorals. Do not allow the back to arch away from the bench. Maintain all points of contact with the bench and keep your feet firmly on the floor/riser.

Step 4

Upward Phase: Exhale and gently press upward to straighten the elbows with the dumbbells positioned at or just below the level of your eyes. Wrists are in neutral position. Do not allow the back to arch away from the bench. Maintain all points of contact with the bench and keep your feet firmly on the floor/riser throughout the exercise.
Step 5

At the end of the set, signal your spotter to assist you in taking thedumbbells and maintain a firm grip until the dumbbells are taken from your hands.
Safety is very important in this exercise. A spotter should adopt a split-stance position or half-kneeling position with the hands positioned as close to the wrist joint. Keep the hands near, but not touching the wrists unless needed.
readmore »
0
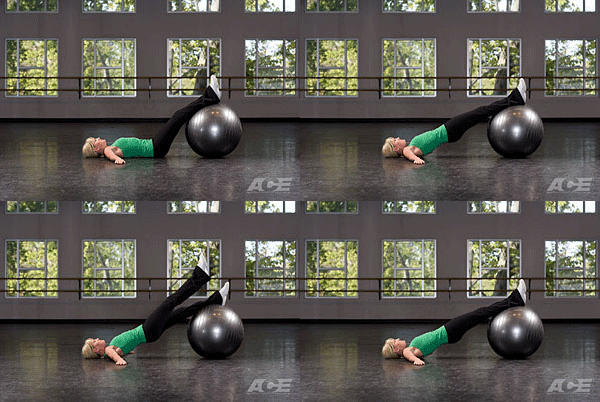
Stability Ball Shoulder (Glute) Bridge |

Step 1

Starting Position: Lie on your back on a mat, placing the backs of your lower legs and heels on the top of a stability ball. Place your feet a few inches apart on the ball with your ankles slightly flexed. Gently use your abdominal/core muscles to press your low back into the floor. Attempt to maintain this gentle muscle contraction throughout the exercise. Your arms are out to your sides with the palms turned down to the floor to help stabilize your body during the exercise.

Step 2

Upward Phase: Gently exhale. Keep the abdominals engaged and lift your hips up off the floor. The backs of your lower legs and heels are pressing into the ball to assist the movement and provide additional stability. Press up until your torso and legs form a straight line with each other. Avoid pushing your hips so high that your low back begins to arch. Maintaining your abdominal contraction helps prevent excessive arching in your low back.

Step 3

Lowering Phase: Inhale and slowly lower yourself back towards your starting position.

Step 4

Exercise Variation (1): To further increase the balance challenge, move your feet closer together on the stability ball.

Step 5

Exercise Variation (2): To further increase the balance challenge, move your arms closer to your side or place them on your chest to reduce the stabilizing points of contact on the floor.

Step 6

Exercise Variation (3): To further increase the balance challenge, raise one leg off the ball toward the ceiling. Do not arch your lower back as you press your hips upward, which normally occurs when your hips are pressed up too far. Contracting your abdominal muscles prior to lifting, and keeping them engaged throughout the lift, helps prevent arching.
readmore »
0
Stability Ball Russian Twist |

Step 1

Starting Position: Sit on the stability ball with your feet flat on the floor. Engage your abdominals to support your spine. Slowly tuck your tailbone under, curling the spine. Begin to walk your feet away from the ball until your head, shoulders and upper back are resting on the ball. Knees should be bent to 90 degrees and your thighs and torso should be at or near parallel to the floor. Knees should be hip-width apart and your feet should be facing forward. Distribute your weight evenly through both feet.

Step 2

Pull your shoulders down and back to make firm contact with the ball. Maintain this position throughout the exercise. Bring your arms over your chest, reaching your arms toward the ceiling. Straighten your elbows and keep your hands together. Press your hands toward one another to help maintain stability and control during the movement.
Step 3

Rotational Movement: Exhale. Brace your torso by contracting your abdominal/core muscles to stabilize your spine. Slowly rotate your torso to one side while keeping your shoulders on the ball and feet firmly planted on the floor. Keep your hips and torso parallel with the floor. Avoid the tendency to let your hips drop down. Push your feet into the floor and hips towards the ceiling to help maintain stability and control. Inhale and hold this position briefly before rotating to the opposite side.

Step 4

Exercise Variation: As you learn to perform this exercise with good form, you can increase the exercise challenge by moving your feet together or adding resistance in the form of holding a medicine ball or cable.
Controlling your balance over the ball is critical for your safety. Avoid fast or bouncy movements that can cause you to lose control and fall.

readmore »
0
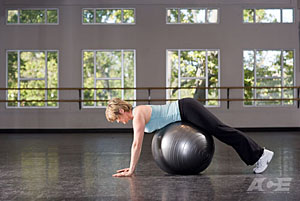
Stability Ball Reverse Extensions |

Step 1

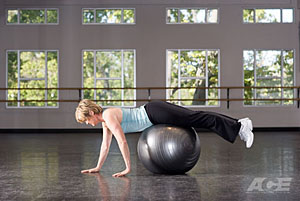
Starting Position: Begin in an all-fours position with your torso on the ball and hands and feet on the floor. Lengthen your legs and stretch your heels to the back of the room. Your hands should be under your shoulders.
Take a few deep breaths. Notice how your abdominals want to rest on the ball when you inhale.
Exhale and pull your abdominals away from the ball. Try to keep them pulled away even when you inhale. This is your abdominal engagement. Try to maintain this engagement throughout the exercise.

Step 2

Upward Phase: Gently exhale. With your abdominals engaged, slowly walk yourself forward until your hips lie directly over the top of the ball. With your feet together, lift your legs off the floor until they are in line with your torso. In this position, your body weight is distributed over the ball and supported by both hands placed on the floor. Press and hold your legs together so they move at the same time.

Step 3

Lowering Phase: Inhale. Keeping your legs pressed together, and slowly lower both legs back to the floor. Knees should be straight throughout the movement.
Do not bring your legs above parallel with the torso. This will cause your low back to arch.

readmore »
0
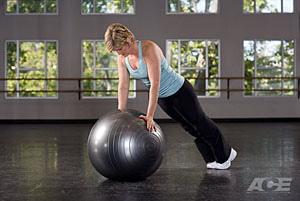
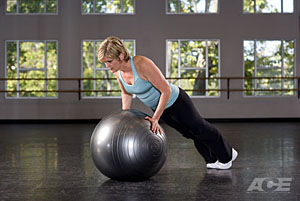
Stability Ball Push-Up |

Step 1

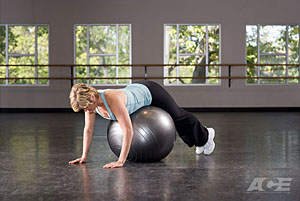
Starting Position: Begin in an all-fours position with your torso on the ball and hands and feet on the floor. Lengthen your legs and stretch your heels to the back of the room. Your hands should be under your shoulders.
Take a few deep breaths. Notice how your abdominals want to rest on the ball when you inhale.
Exhale and pull your abdominals away from the ball. Try to keep them pulled away even when you inhale. This is your abdominal engagement.

Step 2

Slowly walk yourself backwards until your stomach lies directly over the top of the ball with both legs extended and both feet firmly placed on the floor, hip-width apart or wider.

Step 3

Place your hands on the ball, directly under your shoulders with your elbows pointed toward your ankles. Try to squeeze the ball between your hands to create more strength and stability.

Step 4

Upward Phase: Exhale and slowly press your body upward until your elbows are straight, but not locked. Keep your head, torso and leg straight, strong and aligned with one another. Hold this position briefly.

Step 5

Downward Phase: Inhale and gently lower yourself to start position.

Step 6

Exercise Variation (1): If maintaining stability and pressing up is too challenging in this position, do the exercise in a kneeling position. Remember to keep your head, torso and thighs aligned throughout the exercise.

Step 7

Exercise Variation (2): To increase the balance challenge, this exercise can be performed by bringing your feet together behind you and raising one foot off the floor.
Do not allow the low back to sag toward the floor. Your torso and hips should remain rigid and in parallel throughout the exercise.

readmore »
0
Stability Ball Pikes |


Step 1


Starting Position: Begin in an all-fours position with your torso on the ball and hands and feet on the floor. Lengthen your legs and stretch your heels to the back of the room. Your hands should be under your shoulders.
Take a few deep breaths. Notice how your abdominals want to rest on the ball when you inhale.
Exhale and pull your abdominals away from the ball. Try to keep them pulled away even when you inhale. This is your abdominal engagement.

Step 2

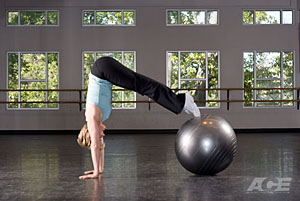
Once you have established your abdominal engagement, slowly walk your hands forward until your feet come off the floor. Continue walking out until the fronts of your thighs or knees are resting on the top of the ball in a plank position.
It is important to keep your ribcage knitted together and the abdominals strong in order to maintain a rigid torso. Your legs should be very active so that your entire body is straight as a board and aligned parallel to the floor.
Keep your shoulder blades pulling away from your shoulders and toward your hips. Elbows must be straight and hands directly under your shoulders. Keep your legs active.

Step 3

Curling Phase: Exhale. Keeping your legs straight and strong, pull your feet toward your chest. The ball will roll forward as your hips pike upward toward the ceiling. Continue this movement until your hips are directly over your shoulders. Your legs, torso and arms should all be straight and strong. Keep your neck long; your head between your arms. Your can point your toes but always keep your toes connected to the top of the ball.
NOTE: This brings your body into somewhat of a handstand position. Be aware of your shoulder strength and keep the elbows straight.

Step 4

Lowering Phase: Inhale and slowly lower yourself back towards the floor, returning your body to the starting position.
Avoid arching (sagging) your lower back or hiking your hips upwards in the starting position. Contract your abdominal, back and glute muscles to keep your torso and legs parallel to the floor.


readmore »