Stuff. Blogger tarafından desteklenmektedir.
Front etiketine sahip kayıtlar gösteriliyor. Tüm kayıtları göster
0
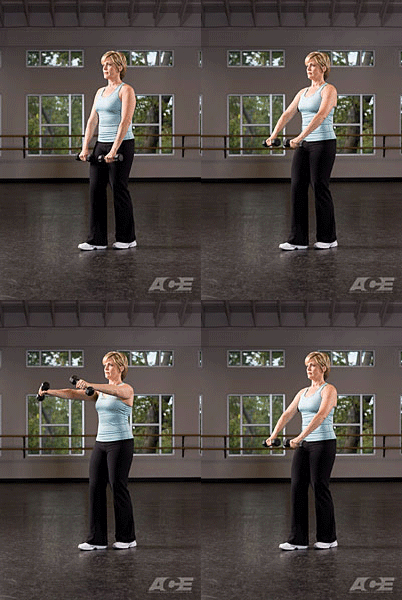
Dumbbell Front Raise |

Step 1

Starting Position: Stand holding dumbbells lightly touching the front of your thighs with thumbs around the handles and palms facing your thighs. Your elbows should be straight or slightly bent. Stand with your feet slightly wider than hip distance or take a stance with one foot slightly in front of the other in order to aid in stabilizing your body.

Step 2

Brace your torso by contracting your abdominal/core muscles and pull your shoulder blades down and back. Do not allow the back to arch. Maintain these engagements throughout the exercise. Your head should be aligned with your spine.

Step 3

Upward Phase: Exhale and slowly raise the dumbbells up in front of your body. Your elbows and upper arms should rise together and lead the movement ahead of the forearms and dumbbells. As your arms near shoulder level, turn your thumbs slightly upward. Continue raising thedumbbells until your arms are level with your shoulders and approximately parallel with the floor. Keep your torso erect. Do not allow the back to arch or the torso to rock. Keep the wrists in neutral. Do not allow the wrists to bend.

Step 4

Downward Phase: Inhale and gently lower the dumbbells back to your starting position. Keep your elbows almost straight, maintaining the neutral grip position. While lowering the dumbbells rotate the thumbs back to start position (slightly downward). Your foot, torso, shoulder and wrist positions are maintained throughout the exercise.
Traditionally, this exercise positions the arms into internal rotation during the lift, so the slight external rotation initiated at the 60-70 degree mark may reduce potential impingement in the shoulder joint.
readmore »
0
Dumbbell Front Squat |

Step 1

Starting Position: Stand with your feet slightly wider than hip-width, turned slightly outward. Hold a dumbbell each hand by your sides, with your palms facing inward. Pull your shoulder blades down and back.

Step 2

Engage your core and abdominal muscles ("bracing") to stabilize your spine. Curl the dumbbells to a position where they rest on the front edge of your shoulders or just in front of your shoulders. Keep your chest up lifted and your chin parallel to the ground or slightly lifted. Shift your weight into your heels.

Step 3

Downward Phase: Begin this phase by hinging at the hips, shifting them back and down. Your hips and knees bend simultaneously. As you lower your hips the knees bend and will start to shift forward slowly. Try to prevent your knees from traveling too far forward past the toes. Keep the abdominals/core muscles engaged and try to keep your back flat (do not tuck the tail or arch the low back).

Step 4

Continue to lower yourself until your thighs are parallel or almost parallel to the floor. If your heels begin to lift off the floor or your torso begins to round, return to start position. Be aware of any movement that may occur at your feet, ankles and knees. Work to ensure that the feet do not move, the ankles do not collapse in or out and the knees remain lined up with the second toe.

Step 5

Lowered Position: Keep the knees aligned with the second toe and body weight evenly distributed between the balls and heels of both feet. If you can view this from the side, your shinbone should be parallel with your torso and the low back should appear flat or may be showing the beginning of some rounding.

Step 6

Upward Phase: While maintaining the position of your back, chest and head and with the abdominals engaged, exhale and return to start position by pushing your feet into the floor through your heels. The hips and torso should rise together. Keep the heels flat on the floor and knees aligned with the second toe.
Technique is very important in this lift. The tendency is to hold the shinbone too vertical which forces you to lean your torso too far forward. Using a mirror for feedback, shift your shinbones forward while keeping your heels on the floor, then bring your torso more upright, but do so from the hips and not through the low back. Squeeze your abdominals to help prevent excess arching in the back with this correction.
readmore »